
Pen Holders Set
Designing and 3D printing an interactive and multi-usage pen holders set
SolidWorks Modeling
3D Printing
October 24 2023 – November 2 2023
Individual Project for HCDE 451
Context
Drawing is one of my hobbies, so I always keep all sorts of pencils, pencil lead, graphic pens, and erasers organized in a pen holder. The problem with having all of them in one pen holder is that it’s hard to find smaller items such as an eraser. To address this problem, I wanted to create a pen holders set with varying heights so that it’s easier for users to organize and find items.
Design
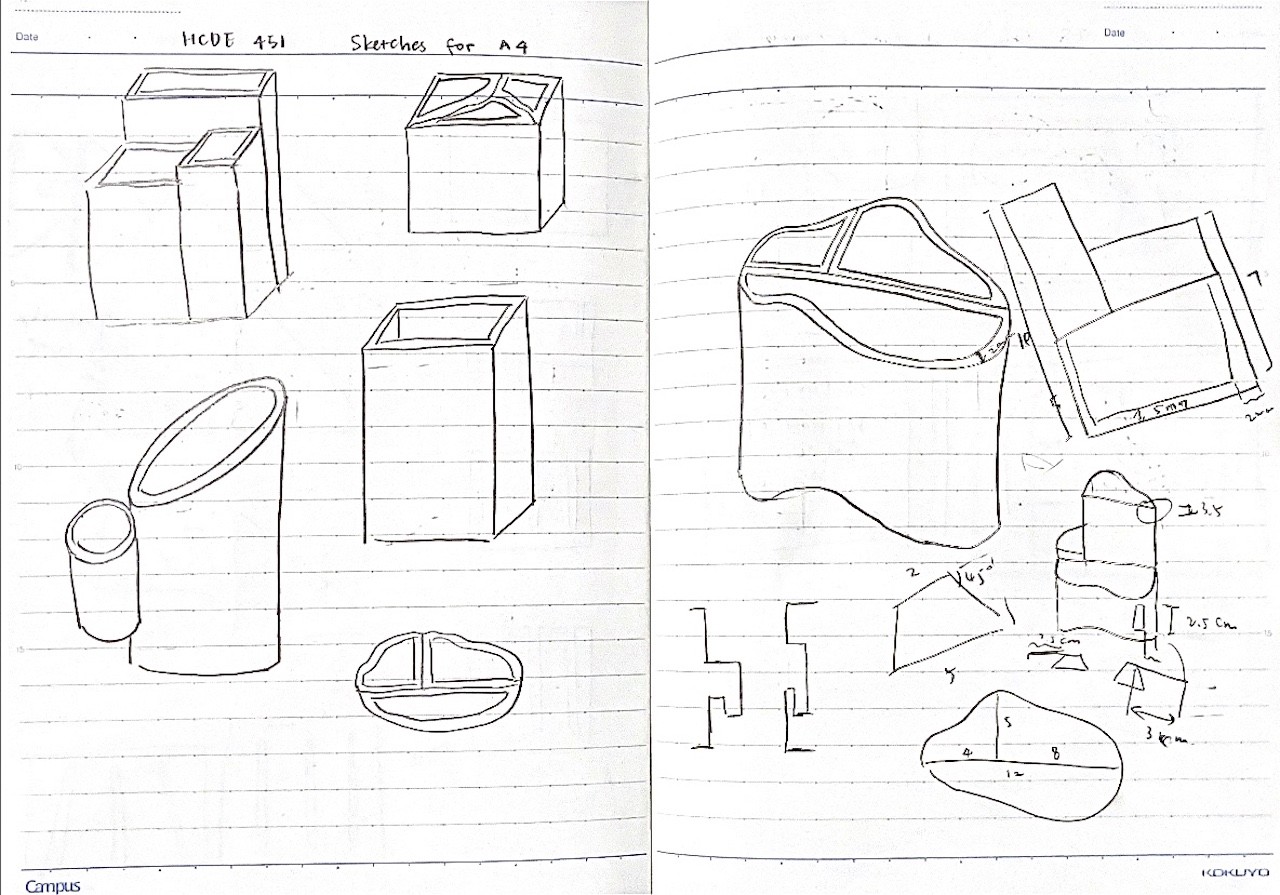
Iteration #1
I built a quick prototype out of cardboard to understand the shape and dimensions of pen holders. I created a big and a small pen holder, both have the semicircular shape so that the side that is not curved on each holder can be positioned back to back. The pen holders worked, but there are two problems with the current iteration: 1) the larger pen holder could be hard to be held for people with smaller hands and 2) the locking system doesn’t really work.
Hard to Hold with One Hand
For someone who has small hands like me, it could be hard to grab onto the pen holder that is as big as the larger one in the cardboard prototype. So I would keep in mind to model reasonable dimensions in my next iteration.
The Locking Joint
I attempted to make a joint by adding a cuboid-shaped component to the larger pen holder and cutting out a cuboid from the smaller pen holder. I wanted to create a design and allows the smaller part to fit together with the larger part. Although this concept would potentially allow the parts to fit, it’s not enough for actually locking the two parts tight together. The pen holders for sure can function on their own, but it would be more interesting to interact with if users can assemble or disassemble the pen holders based on their needs.
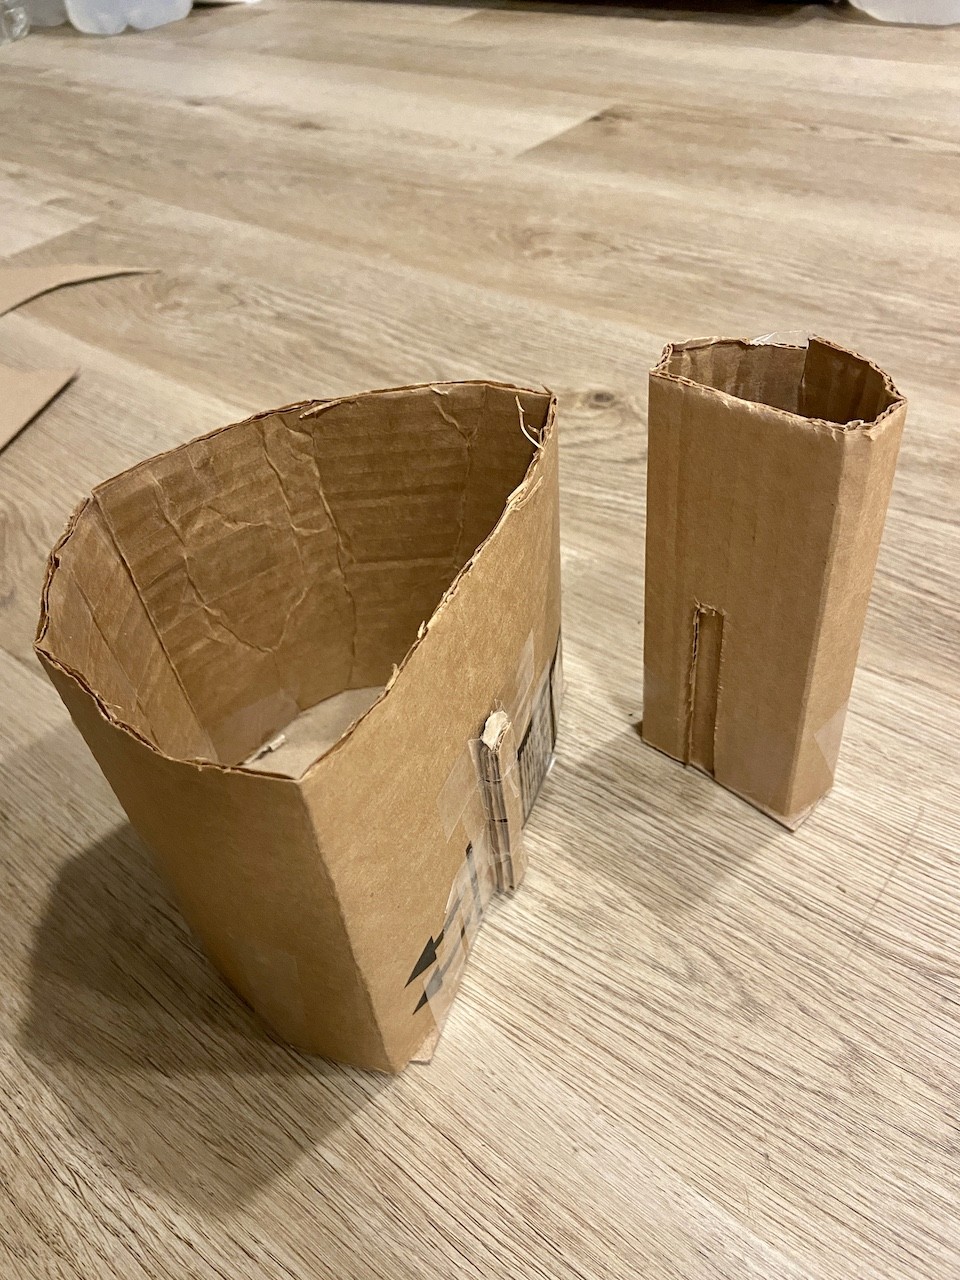
Iteration #1 of the pen holders set
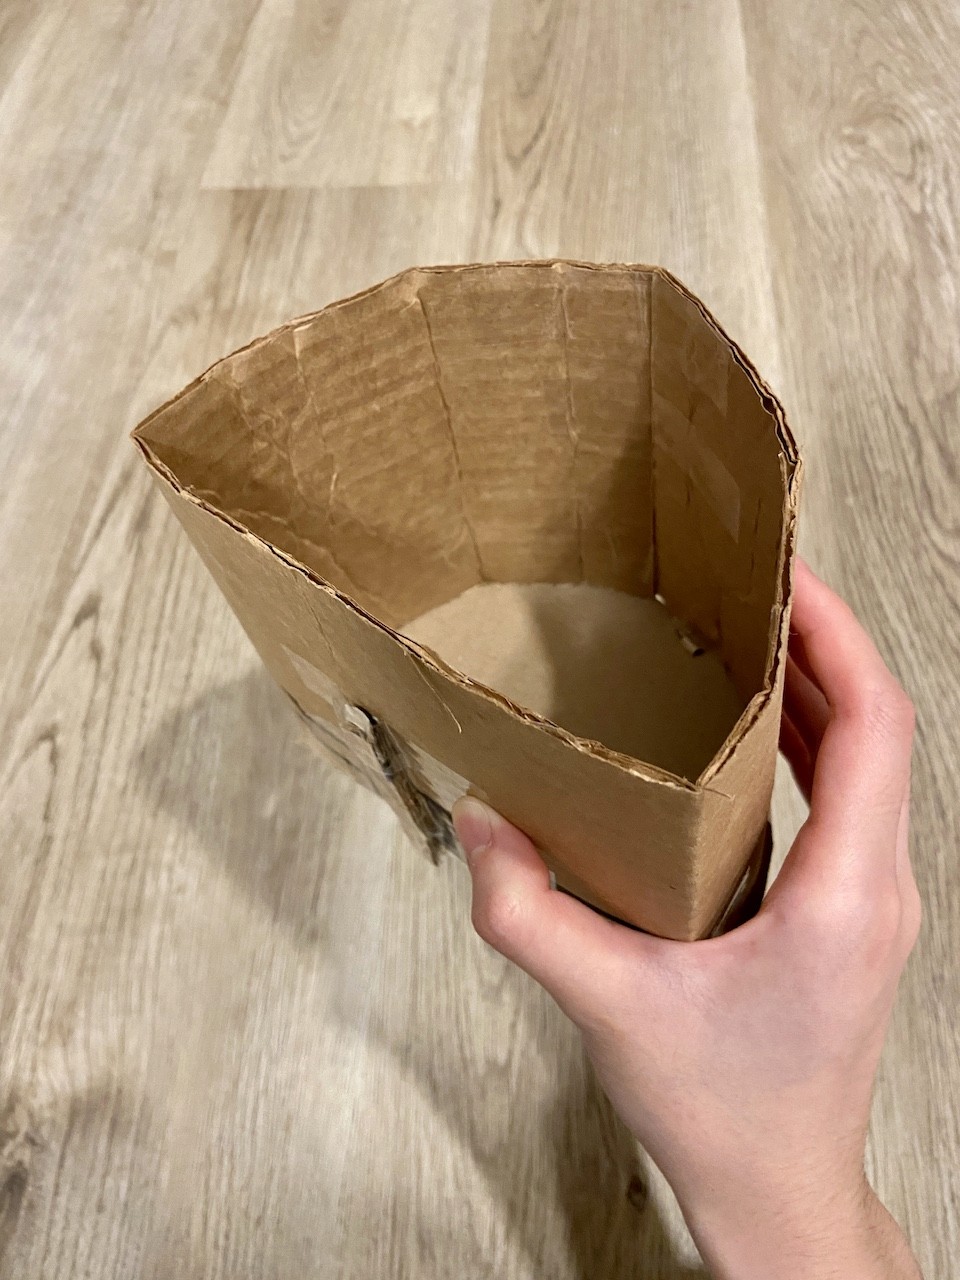
The large pen holder is hard for a user with small hands to grab onto
Iteration #2
At first, I designed three triangle pieces to serve as the vertical structure of the stand, but then there would be nothing to prevent a tablet from sliding off. That’s why I designed a place on each one of the triangles for holding the tablet in place. I also designed two slots on the side of each triangle to create joints with the horizontal pieces.
Shape and Height
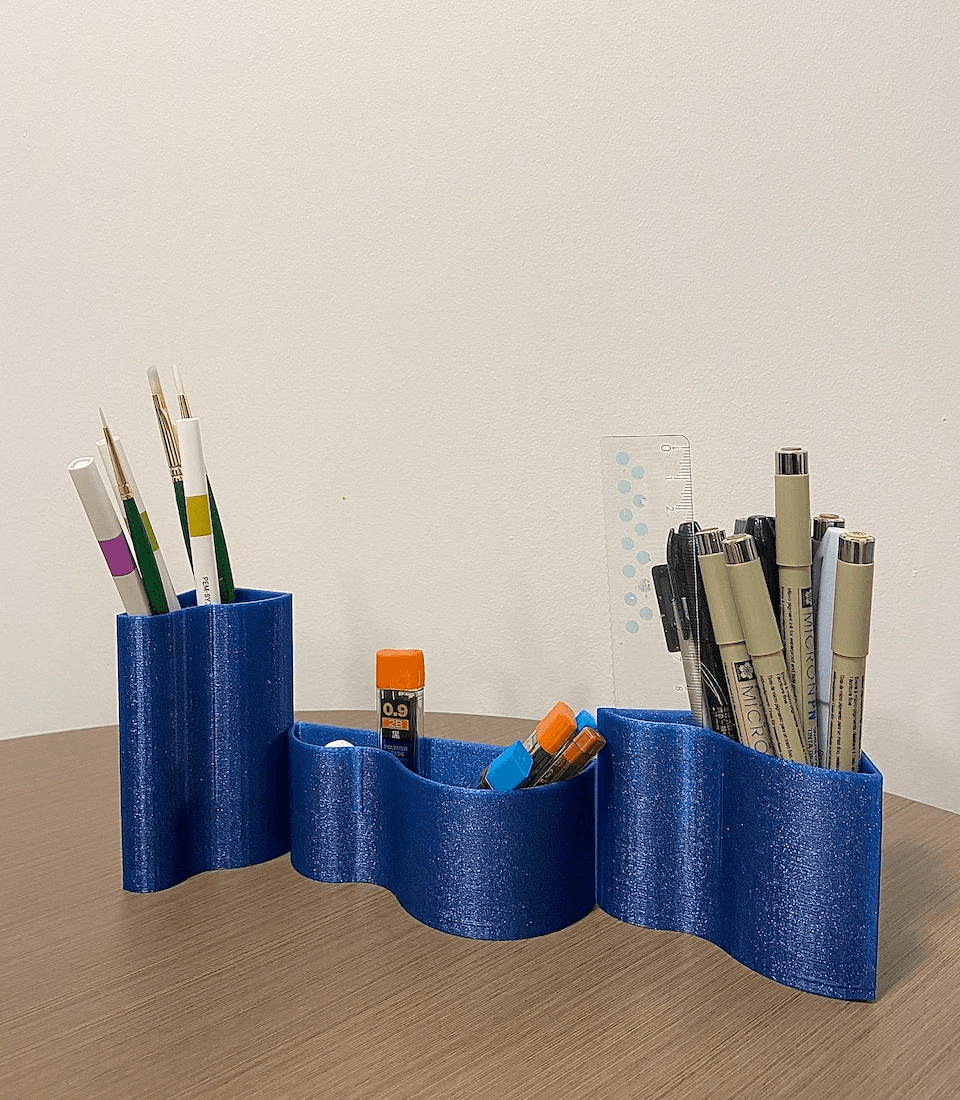
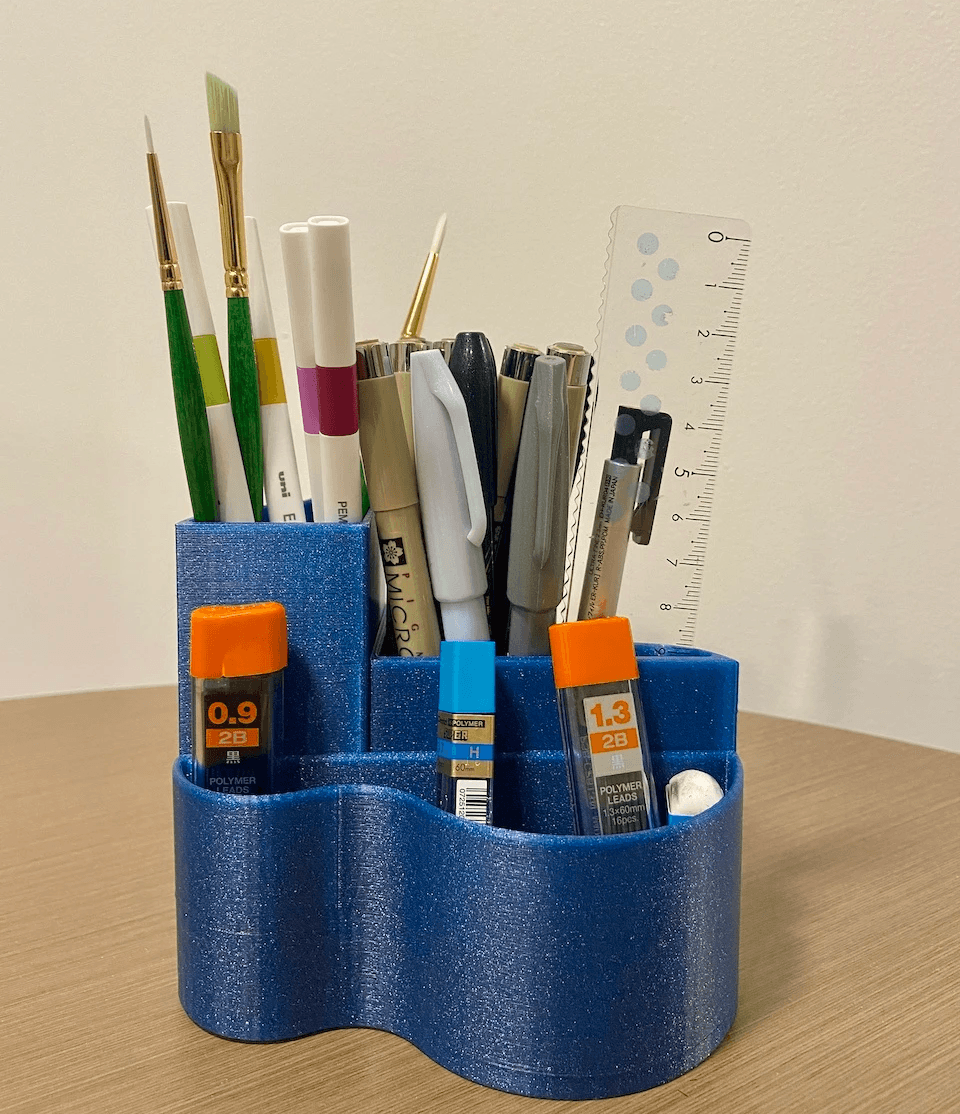
Once I had an idea of what I wanted to design, I started to build a CAD model in SolidWorks. The shape of the pen holder should be curved to make it easy for users to grab onto and to provide visual aesthetic. The pen holder set should consist of three parts, with heights of 5 cm, 7 cm, and 10 cm respectively. The height differences among the three parts should allow users to easily organize stuff with varying dimensions.
Fit and Clearance
Learning from my first iteration, I needed to change the locking system in order to lock the parts in place. My very first idea was to create a hook shape to connect the parts, but I didn’t pursue the idea because parts could be easy to fall apart if someone attempts to move the whole thing around by holding only one part. The next thing that came to mind was to keep the sliding in idea from my first iteration, but to create trapezoidal cylinder shapes instead of cuboids. This design was simple to model and could easily lock the parts together, so I decided to pursue this idea. Since I wanted to create a tight fit among the three parts, the clearance for the locking parts was intentionally designed to be small (0.05 cm).

Assembling parts in SolidWorks
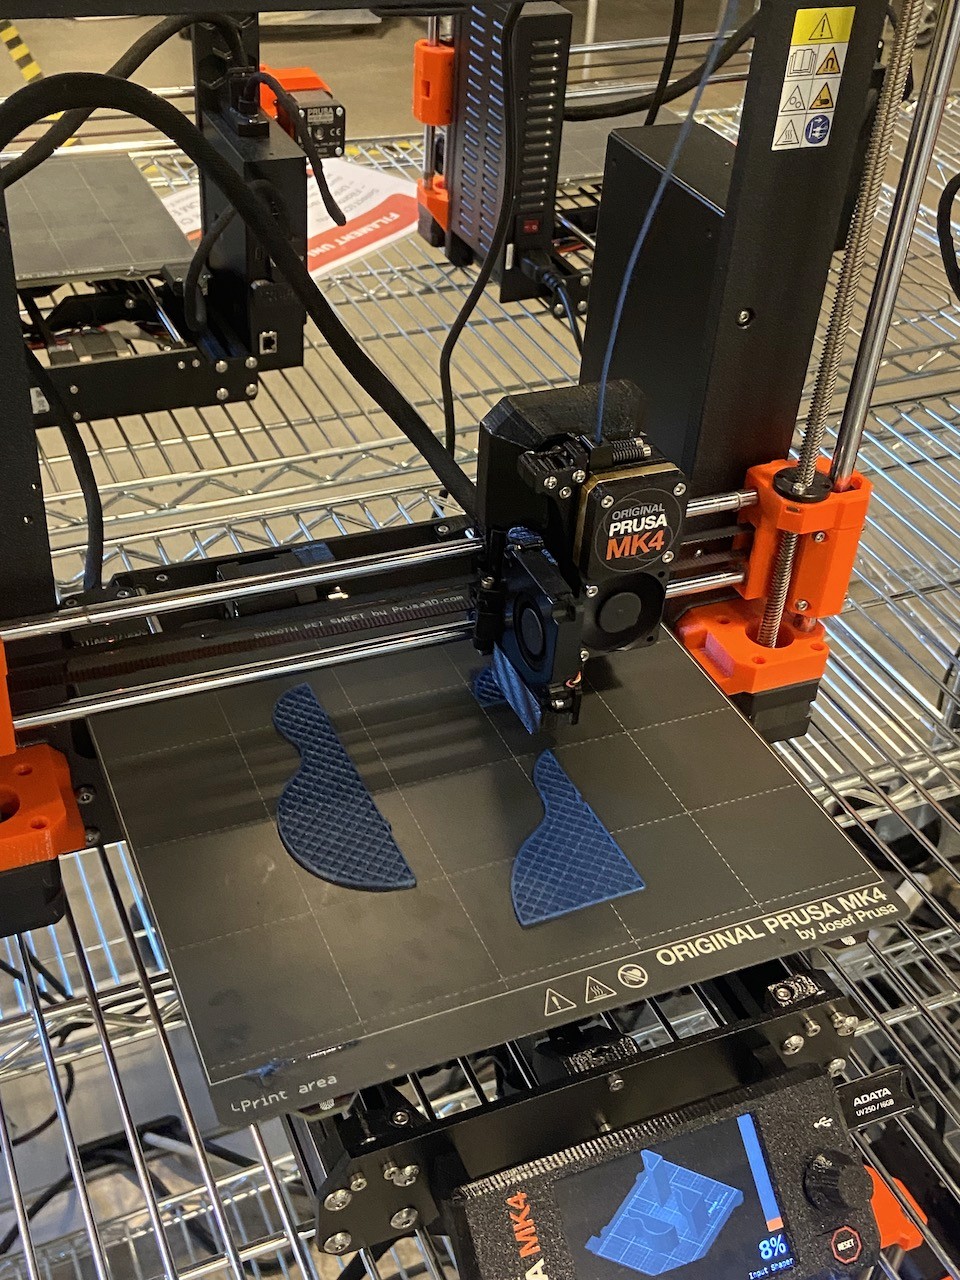
The 3D printing process
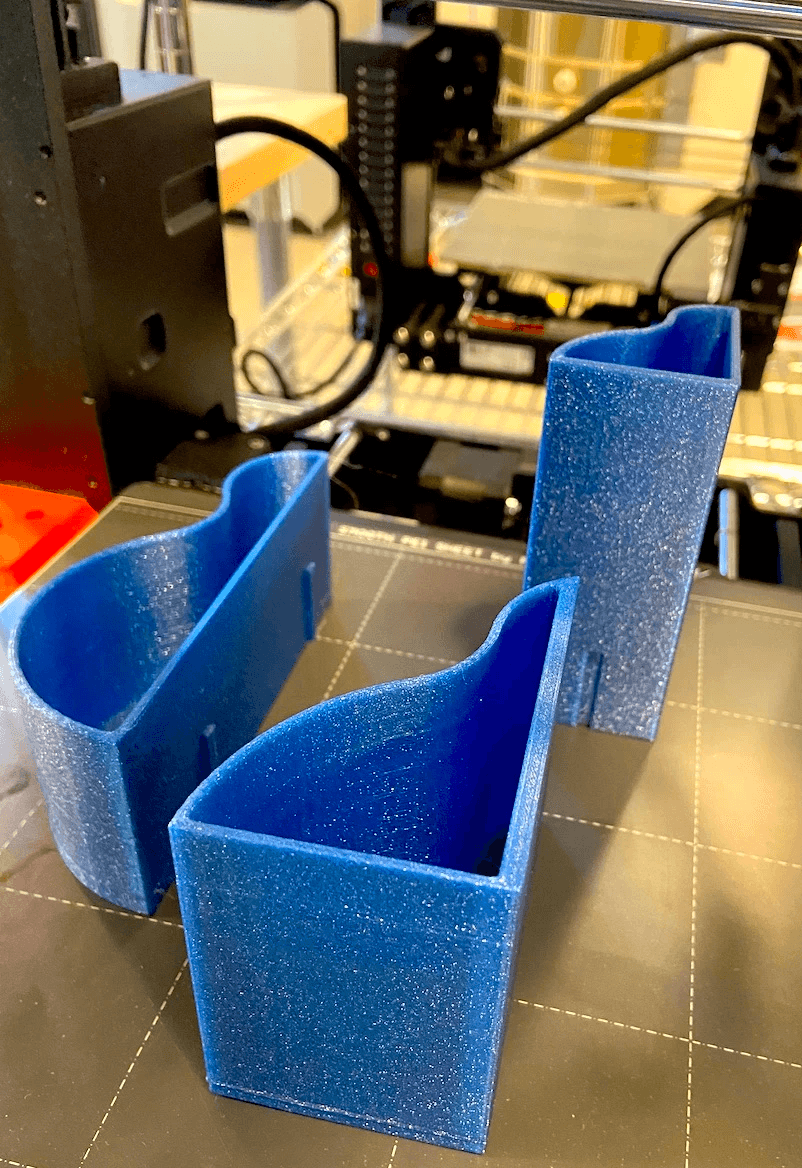
The 3 parts were printed together
The three parts could be assembled without using glue
The Outcome
After finishing modeling the design, I output the model as an STL file and sliced the model using PrusaSlicer. I chose to use a 20% infill to create a decent shape of my design and reduce the printing time. Then I input the G-code to a 3D printer and got my design printed with PLA material. The print was successful.
Each pen holder was printed separately and can serve as independent pen holders. As a set, the printed pen holder can be assembled in two ways. So there are 3 different forms that users can play around with for the pen holder set (Please see pictures below):

Form #1: Using each pen holder independently
The orientation of any of the pen holders is flexible.
Users can position these parts in any orientation since they are not locked together in this form.
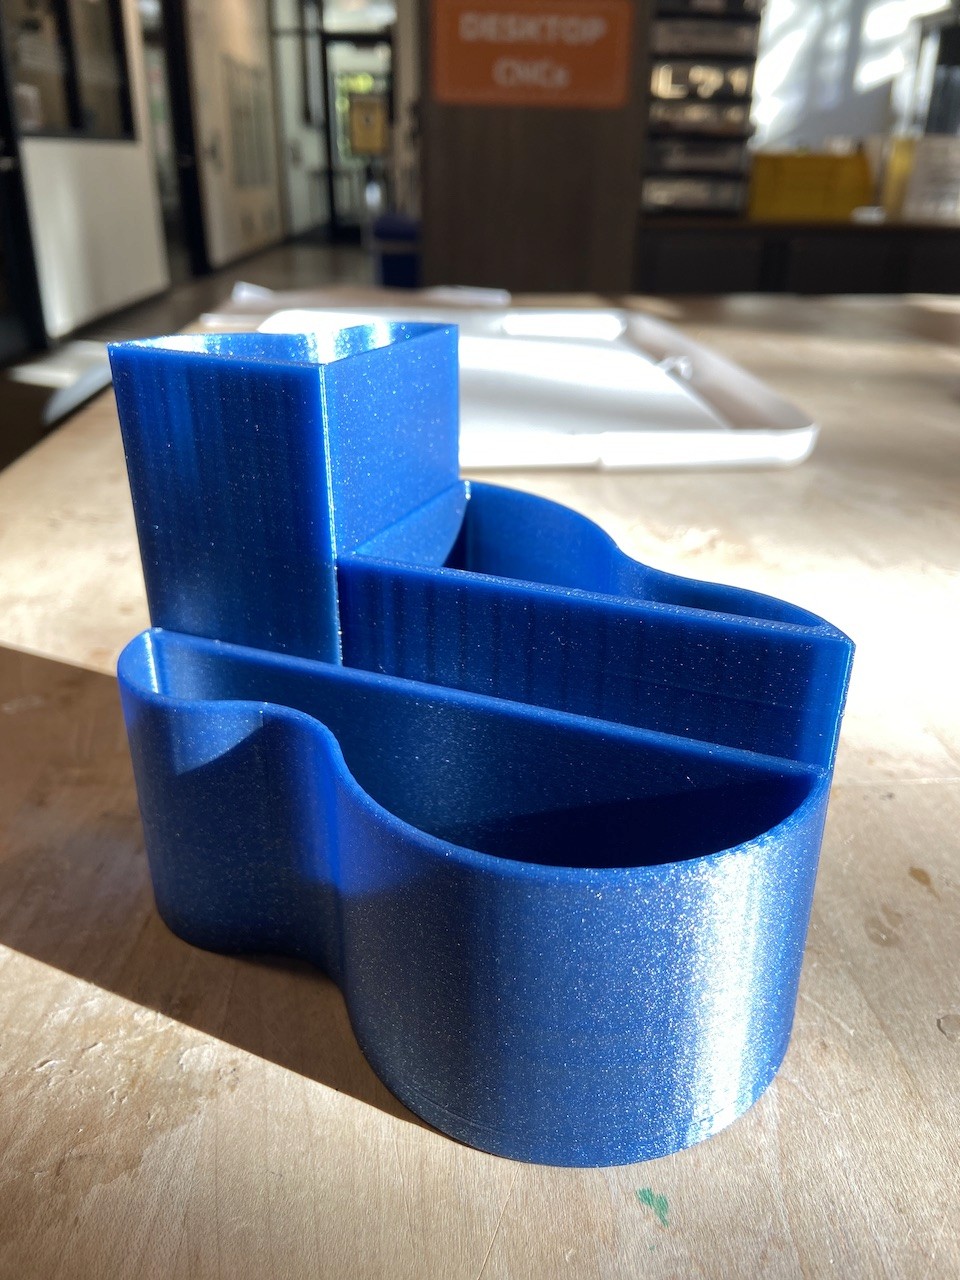
Form #2: Assembling the three parts together
The entity…
1) affords the needs of holding pens and stationaries
2) is easy to grab onto and move around
3) is visually appealing
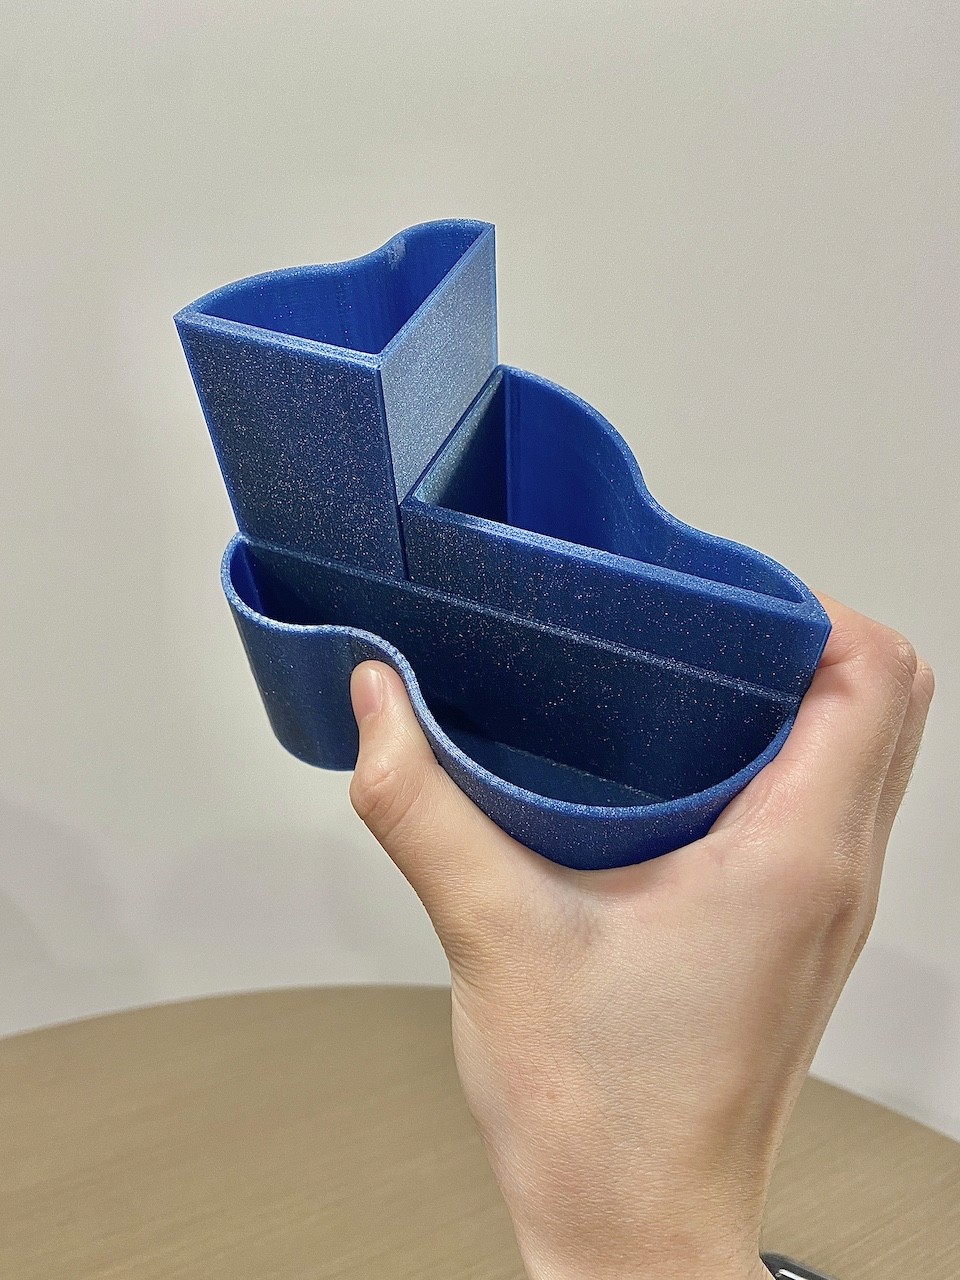
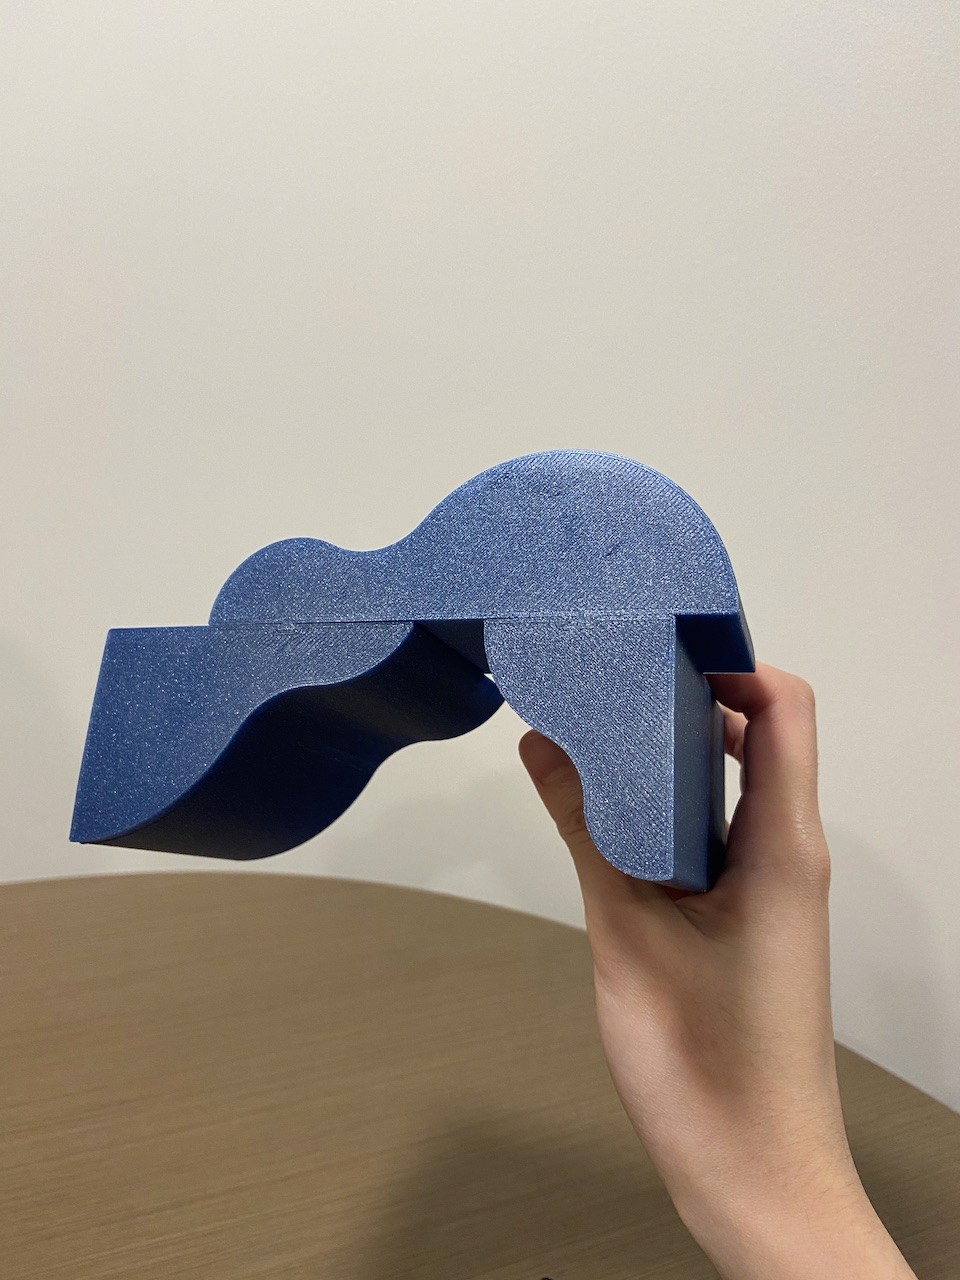
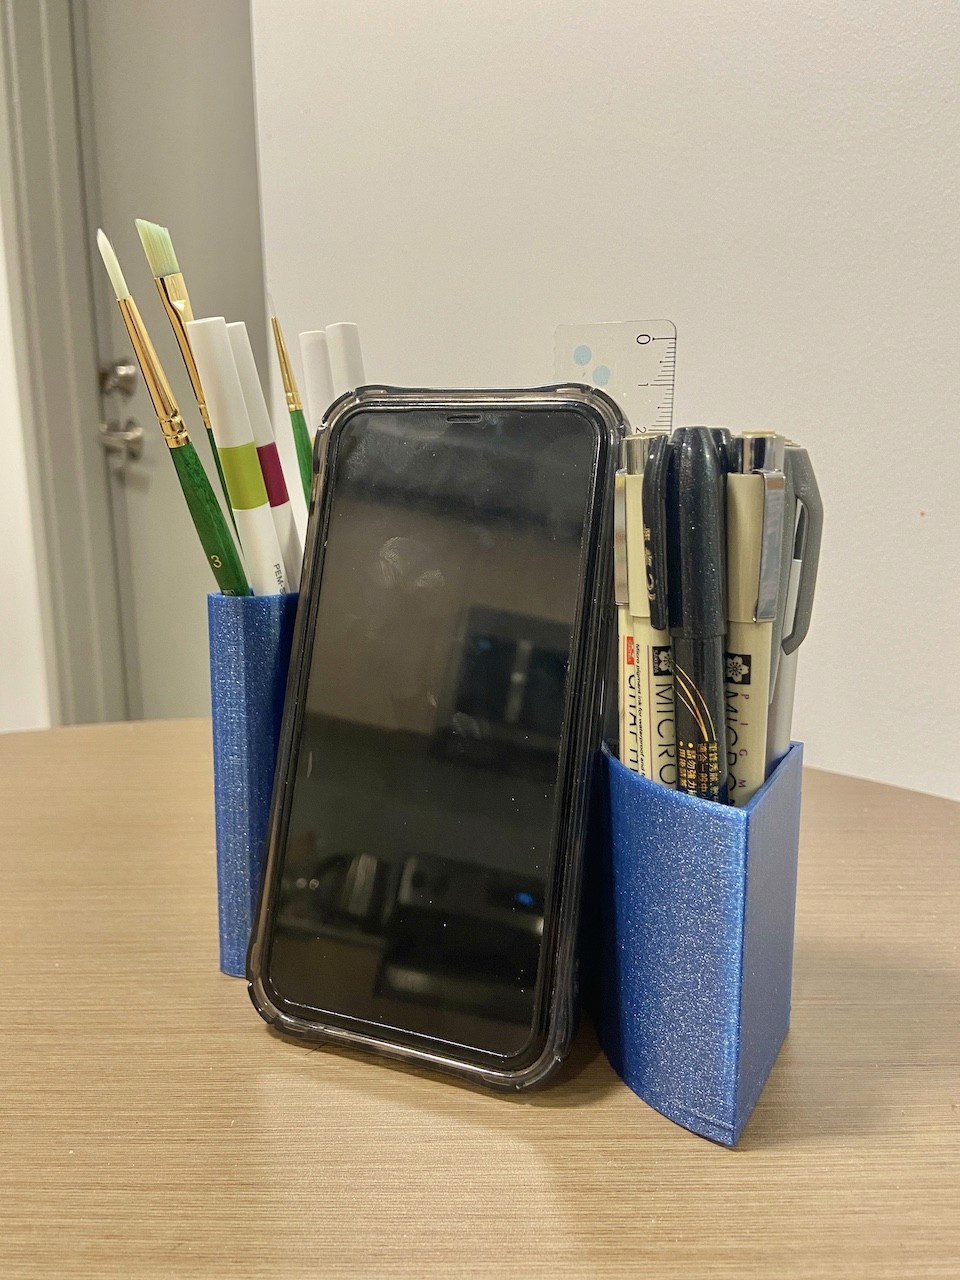
Form #3: Swapping the position of the two smaller components.
The entity can serve as…
1) Pen holders
2) A cell phone stand
Analysis
Feedback from Critique
What worked well?
Shape: The curved outside of the pen holders not only makes the pen holder easy to grab onto, especially for users who have smaller hands, but also provides visual aesthetics to the product.
Varying Heights: The pen holders set has three parts with different heights, making it convenient for users to organize and store their stationaries.
Sliding Lock: It’s intuitive and easy for users to slide in and out components to assemble or disassemble the pen holders set.
What could be improved?
Surface finish: Due to the friction caused by the 3D-printed PLA layers, it’s somewhat hard for users to smoothly slide in the components. I could improve the product by polishing the surface of the 3D printed parts to make the product easy to assemble.
Wall thickness: The wall thickness of the pen holder set is not consistent among all the parts, specifically two walls in the two smaller parts are thicker because materials were extruded cut from the walls to implement the sliding lock. In my next iteration, I can model the parts with consistent wall thickness so that the product would look more uniform and aesthetically appealing.
Clearance: The current clearance for the sliding lock is 0.05 cm, which makes the products a little bit too tight to assemble. I could try to increase the clearance in the model of my next iteration to test if a larger clearance works better for the sliding feature.
Reflection
Throughout designing, modeling, and 3D printing the pen holders set, I applied my CAD skill to create a product that is useful, interactive, and visually appealing. In addition, the process of figuring out how to lock components together taught me the importance of iterating and refining an initial design idea. In my future design work, I will make sure to prototype multiple iterations to test out ideas and create convenient and accessible products.
© 2024 Lushan Wang Portfolio. All rights reserved.